Monday, September 30, 2013

Testing your Exchange Server ActiveSync


Back in the old days, it was possible to download a kind of virtual Windows Mobile device which you could use to test your Exchange ActiveSync. Today you got more options.

Microsoft Remote Connectivity Analyzer
First, everybody must get to know Microsoft's Remote Connectivity Analyzer found here .


Microsoft did a great job with this tool which continues to evolve over time, providing more and more testing tools, from ActiveSync, to Autodiscover, Web services, Outlook Anywhere, POP/SMTP, Lync and OCS and even the Microsoft  cloud (Office 365).

This online tool often provides detailed information regarding the steps taken and what went wrong.


MobilityDojo.net - EAS - MD Tool
One of my favorite ActiveSync testing tools for some time is MobilityDojo.net 's EAS-MD tool. Click here
The tool, which is also updated by it's creators, supports Exchange 2007/2010/2013.
Unlike Microsoft's Remote Connectivity Analyzer, EAS-MD puts it's focus on ActiveSync and Autodiscover (partially since it still will not analyze Service Connection Point (SCP) data from Active Directory).

However, the thing I like most about this tool, is that it is simple to user, and you can use it anywhere on your network or the Internet.

before we go into a few screenshots, let me give you examples regarding how I put this tool to use:

  • Testing "Before" or "After" your proxy/router  When your infrastructure includes a reverse proxy / TMG server / firewall / router, and you want to troubleshoot ActiveSync connectivity "before" the device or server (on your LAN), or "after" the proxy (in your DMZ or Internet).

    Running synchronization tests with the tool in both locations (something you will usually not be able to do with a real device because of DNS name resolution and networking restrictions) will help you find out if the problem is with the Exchange server, proxy server or even with your ISP.

  • Testing specific CAS servers in a CAS Array 
    Without a direct testing tool, checking each CAS (Client Access Server) in a CAS Array for ActiveSync problems (independent of Exchange's own built in tests and logs), can be very challenging. Using the tool you can simply configure the individual CAS server you want to test.

  • Testing specific user connectivity issues
    If you administer Exchange servers, you probably know the case... A user cannot sync a device, and you have to help him as well as provide proof that your precious Exchange server is not refusing service to the user. All you need to do is have the user enter his credentials into the tool and basic ActiveSync connectivity tests will be performed with his / her mailbox.

  • Creating Fake devices
    Strange... but in an upcoming post I will show you that having too many ActiveSync devices partnered to a specific mailbox can cause you a and your users a lot of headache.
    Before removing real device partnerships (using the upcoming article), you can use the EAS-MD tool to create "Fake" devices with your test mailboxes so you can test the procedures of deleting device partnerships without really using multiple phones or tablets.

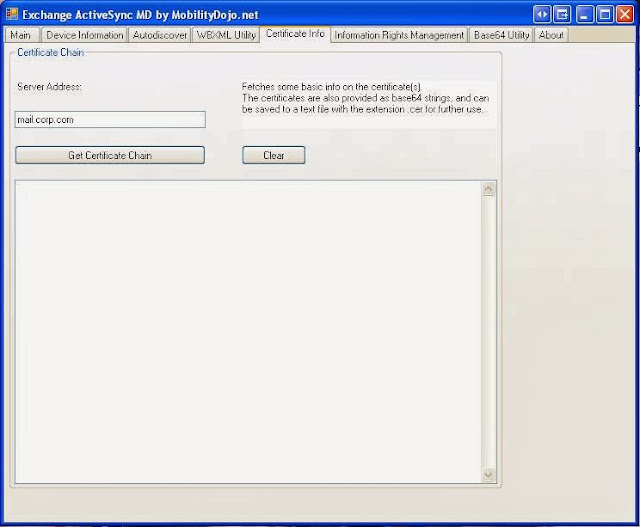
  • Checking your SSL Certificates
    The tool can also query and provide information regarding your SSL certificates. The information can also be copied as text for later troubleshooting.

I'm sure that other reasons can be found to use this tool, so lets have a look.

First download the small ZIP file containing the tool from here
The web site states the version as 1.6, but it is actually 1.7. The site also states that Windows 7/2008 are required, but I had no problem running in on Windows XP SP3.

Testing connectivity and Synchronization
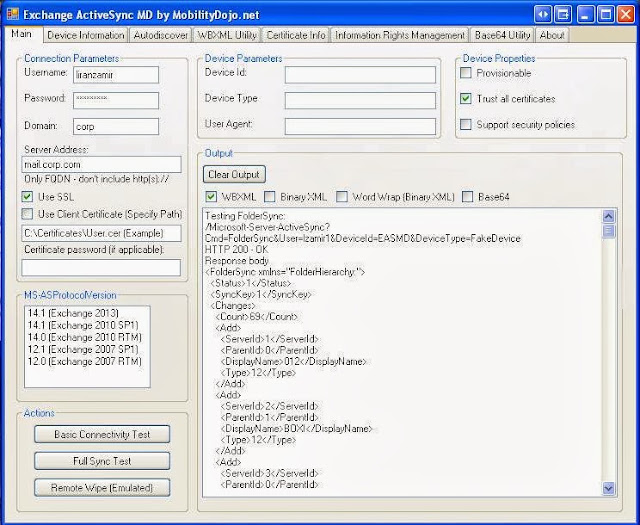


The fist screen of the application is usually the one you need for ActiveSync testing.
In the connection parameters enter your (mailbox to be tested) domain credentials, the CAS server name
(This can be from the Internet or from inside your LAN), select to use SSL (who doesn't), and version of Exchange server.

On the upper right, select Trust all certificates. This will have you bypass sync issues that will likely happen when you are testing on your LAN (such as using self signed certificate which you did not bother to install the CA certificate to your test computer, testing a specific CAS server internal FQDN which is not a part of the certificate's Subject Alternate Name, and so on).

Now click Basic Connectivity Test to perform... basic test :-) this test will show you that you are able to talk to the CAS server over ActiveSync and authenticate.

Now you can click Clear Output to clean the screen.

Click Full Sync Test to re-authenticate and actually see a synchronization of the mailbox folders.


Testing AutoDiscover
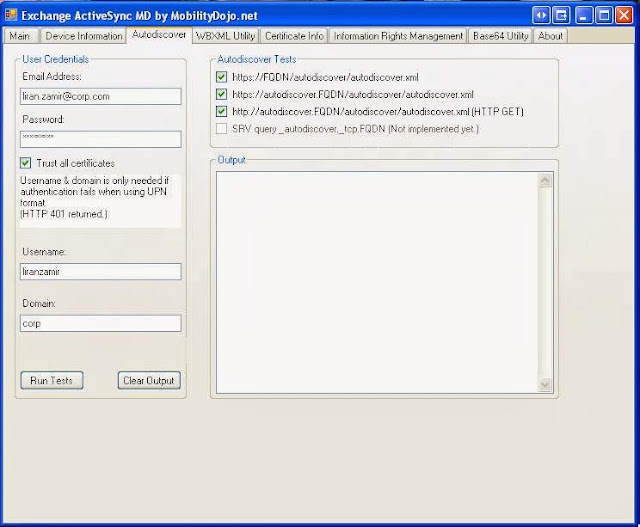


This test is somewhat disappointing as it still cannot query Active Directory for SCP (Service Connectio Point) which is the source of AutoDiscover information for domain joined workstations.
However, if you rely on DNS records (internal or externally to your network), the tool will query them and show you if it was successful or not and what it found. Use the information for troubleshooting incorrect settings.

Testing the certificate chain


Unless you are using a self signed certificate, the SSL certificate on your Exchange server or proxy server came from a Certificate Authority (CA).
Certificate Authorities are servers which issue digital certificates to other CAs and/or the final SSL certificates (this is a very loose explanation). In order for a certificate to be trusted or "believable" by devices such as ActiveSync devices, web browsers and mail clients, the entire "Certificate chain" must be known and trusted.
Use this tool to query the certificate chain of your Exchange / TMG SSL certificate when the certificate may be the root of the connectivity issues.

Hope this makes sense...

Post your feedback. Please !

Monday, September 23, 2013

Load Powershell Addins in your scripts


It is often that you want to write a script which uses Powershell cmdlets that are not the basic ones found in Powershell v2.0.

For example, you might want to perform actions on Active Directory using Windows 2008 built in AD commands, Exchange 2010 commands or even Quest Active Roles.

Option 1 - Importing the cmdlets from the batch
One option to run a script with Exchange 2010 commands (on a sever running Exchange 2010 or a server with the Exchange management tools installed) is to call the script from from a batch file which loads the Exchange powershell extentions from the batch file. For Example you .cmd or .bat file will look like this:

C:\Windows\System32\WindowsPowerShell\v1.0\powershell.exe -command ". 'C:\Program Files\Microsoft\Exchange Server\V14\bin\RemoteExchange.ps1'; Connect-ExchangeServer -auto; C:\Scripts\YourScriptName.PS1"


Option 2 - Importing the  cmdlets  from the script
This option - also running on an Exchange server or a server with the Exchange management tools installed, use the batch to load the script using the "Normal" Powershell with this command:

powershell -command "& 'C:/scripts/YourScriptName.ps1'"

and

In the script file, use the following commands to load the needed PSSnapIn:

For Exchange 2010 PSSnapIn
Add-PSSnapIn Microsoft.Exchange.Management.PowerShell.E2010

For Microsoft Active Directory commands (2008)
Import-Module activedirectory

For Microsoft Microsoft Lync 2010
Import-Module Lync

For Quest Active-Roles commands (Free download from Quest software Click Here )
Add-PSSnapin Quest.ActiveRoles.Admanagement


Example:

createmailboxlist.cmd
powershell -command "& 'C:/scripts/Mailboxlistgenerator.ps1'" 


Mailboxlistgenerator.ps1
Add-PSSnapIn Microsoft.Exchange.Management.PowerShell.E2010 
$list = get-mailbox -resultsize unlimited | select name,database,primarysmtpaddress
$list | export-csv c:\scripts\Mailboxlist.csv


Option 3 - Remoting commands to Exchange server
This option allows you to run Exchange Powershell commands from a computer running Powershell with
no Exchange snap-ins by creating a remote session to the Exchange server.
This requires an http connection between the the server or workstation and the Exchange server.
Use the following commands:

$Session = new-pssession -configurationname microsoft.exchange -connectionUri http://ExchangeServerName/powershell
Import-PSSession $Session

From this step you can run Exchange Powershell commands.


Now all you need is to schedule the command by running the batch or run it manually


Thursday, September 19, 2013

Exchange sites you should know


There are TONS of great web site. Information is all over.

I would like you to know some of my favorite Exchange and Powershell sites, which I believe you may find useful.

TechNet Exchange 2010 Virtual Lab
The Virtual Lab provides you a place to learn regarding aspects of Exchange 2010, and even more a small test platform for you to play with if you wish to try something - and you do not have a lab.
Each session will give you 90 minutes of a working Exchange 2010 environment.

Exchange Team Blog
A great site to learn new stuff about Exchange, what's coming up and great drill-downs.

I will add more sites to the list as I go on.


Wednesday, September 18, 2013

The mailbox database size is much larger than the mailboxes.. What's up with that ???


You may notice that the database is much larger than the actual mailbox content.
It is important to know that the database contains additional data.. and that's the Dumpster data.

The database dumpster contains:
- Deleted mailboxes on retention (keep deleted mailboxes for X days in the mailbox database limits tab)
- Deleted items in the mailbox (Keep deleted items for X days in the mailbox database limits tab)
The deleted items in retention include items that were removed then a user empties the "Deleted Items" folder (this is known as "Soft Delete") or when the user Shift+Del an item ("Hard Delete").

All of those items are not counted as a part of the regular mailbox size limit, the dumpster limit is used instead.

Note! Deleted items can be recovered by using Outlook client or using Outlook Web App as long as the number of days that passed since the soft or hard deletion did not exceed the configured retention time that was set on the database Limits properties tab.

Exchange 2010 set a limit to the dumpster by default to the amazing size of 30 GB Per mailbox !
This means that a user with a limited mailbox size of 100 MB can potentially get large Emails, delete them, empty the deleted items folder (or use hard delete: Shift+Del), and than the content will be stored in the dumpster and will not longer be counted for the mailbox size limit.
A user might have a 50 MB mailbox size and up to 30 GB of dumpster items... all of which takes up space in the mailbox database. That is a lot !

important note !
The default dumpster quota size of 30 GB mentioned above is only applied to a mailboxes if a mailboxes are configured to inherit their size limit from the database limit settings.
If you decided NOT to use the size limit settings from the database limits tab, and assign size limits individually, the 30 GB dumpster limit will not take effect at all, in fact user will actually have unlimited dumpster size... This may mean troubles.
The dumpster limits will be ignored when a mailbox is configured on various type of legal hold. If you set one, you probably know about it..

Do large dumpsters effect your Exchange environment ?
Before you decide if and what action to take, wouldn't you like to know what is the actual effect of the dumpster usage in your Exchange databases ? Of course you do.

You can collect this data from the user mailboxes with the following EMS (Exchange Powershell) command:

$MBX = get-mailbox -resultsize unlimited | Get-MailboxStatistics | select displayname,totaldeleteditemsize,database 

The above command will query every mailbox in the Exchange organization and will fetch the name of the owner of the mailbox, the mailbox total dumpster size, and the database containing the mailbox. The results are than stored in an array inside the $MBX variable (Which we can later manipulate). 

Now we would like to view the results easily. We will take the data and sort it by the recoverable items size (dumpster size), largest results first:

$MBX | 
Sort-Object TotalDeletedItemSize -Descending
Now you can take the sorted results, and save them back to the variable:

$MBX = 
$MBX | Sort-Object TotalDeletedItemSize -Descending

Would you like to see only the top five mailboxes ? try this:
(make sure you used the previous command to save the sorted list) :

$mbx | select -first 5

Or get only the list of mailboxes where the dumpster size occupy more 1 GB or more.

$MBX | where {$_.TotalDeletedItemSize -ge 1GB} | Sort-Object TotalDeletedItemSize -Descending

You might also want to export the entire thing to a CSV file to analyze later:

$MBX | export-csv c:\mailboxrecoverables.csv -NoTypeInformation

What about getting the report to your Email ? (Change the second command based on your organization).

$HtmlBody = $mbx | convertto-html | out-string

Send-MailMessage -from Dumpster@yourdomain.com -to YourName@yourdomain.com -Subject "Dumpster Report" -BodyAsHtml $HtmlBody -smtpserver YourExchangeServerName


Not interesting enough ?!?!? Lets put it all into a script which can be scheduled.
The script will fetch the information for all mailboxes as we did before, sort the data based on largest mailbox dumpsters, and Email us only if there are mailboxes with dumpster size over 1GB.


Lets call this script (Click the script name to download) DumpsterReporter.ps1 or DumpsterReporter.zip

#Variables
$filtersize = 300MB
$fromAddress = "DumpsterReport@yourdomain.com"
$ToAddress = "YourEmailAddress@yourdomain.com"
$SMTPServer = "YourExchangeServerFQDN"

# Lets get all the information first
$MBX = get-mailbox -resultsize unlimited | Get-MailboxStatistics | select displayname,totaldeleteditemsize,database

# Find only the mailboxes with dumpster size larger or equal to the limit we chose to look for, save to $results
$results = $mbx | where {$_.totaldeleteditemsize -ge $filtersize} | sort totaldeleteditemsize -descending

# Send the Email only when there are valid results  
If ($results -notlike $null ) 
{
$HtmlBody = $results | convertto-html | out-string
Send-MailMessage -from $fromAddress -to $ToAddress -Subject "Dumpster Report" -BodyAsHtml $HtmlBody -smtpserver $SMTPServer 
}

In order to run the script on schedule on your exchange server, first create a folder for your scripts.
For example: c:\scripts

Save the DumpsterReporter.ps1 script to this folder.
In the folder create a batch / cmd file which will execute the powershell script with the Exchange cmdlets:

for example save the following content in DumpsterReporter.cmd

C:\Windows\System32\WindowsPowerShell\v1.0\powershell.exe -command ". 'C:\Program Files\Microsoft\Exchange Server\V14\bin\RemoteExchange.ps1'; Connect-ExchangeServer -auto; C:\Scripts\DumpsterReporter.PS1"

Now.. all you need to do is to edit the variables in DumpsterReporter.ps1 to march your environment and use the Task Scheduler in control panel to schedule the batch file to run.

To make sure the batch is working fine, first try to run it by double clicking it.

Note that the scheduled task should be set to run with an account which have Exchange permissions, and also select the option "Run whether user is logged on or not"


 Now I know.. what should I do next ?

OK. Now you know if the dumpster size is an issue in your organization or not. It may not be an issue today but it might become one later on so you should consider allocating the dumpster size yourself.

As stated earlier on, setting the Recoverable items Quota can be done on a per Mailbox Database basis, or per Mailbox basis.
The per Database setting will apply to all mailboxes which inherit the mailbox size limit from the database.
The per Mailbox setting is required only when a mailbox is configured with it's own set of limits which are not inherited from the mailbox database.

The behavior of the dumpster quota is FIFO. The oldest item in the dumpster will be removed, even if it did not reach the age to be removed, if a newer item was deleted which caused the quota to exceed the limit.

To set the mailbox database level dumpster warning quota and limit quota use the following command:


Set-MailboxDatabase DatabaseName -RecoverableItemsWarningQuota 3gb -RecoverableItemsQuota 4gb

To set the  dumpster warning quota and limit quota on a mailbox, use the following command:

set-mailbox MailboxName -RecoverableItemsWarningQuota 2GB -RecoverableItemsQuota 3GB

Of course it is up to you to set the appropriate sizes based on your environment. 
What should you consider ?

  • What will be a "Logical" dumpster allocation for a user ?
    This could be impacted by the number of days you set to keep deleted items.
    A user is more likely to have a larger dumpster size for larger number of days.
  • What is the user mailbox size limit ?
    A user with a really limited mailbox size may be forced to repeatedly delete incoming mail.
    This can cause a large dumpster usage, and even more deletion mistakes.
    Consider setting those type of users with at least twice the mailbox size in the dumpster quota.

    For users with large mailboxes, they may not delete items as often, but may accidentally delete an entire folder or folder root with it's sub-folders. Allowing two the mailbox size in dumpster quota may also be useful.
  • What are your storage limits ?
    If storage is tight... get a larger one and enjoy what Exchange 2010 can offer :-).
    But if you cannot do this right now, first consider limiting the number of days that deleted items are retained for the general users. Also use the above script to locate cases of misuse of the dumpster quota either as a result of a regular usage or due to a problem.
  • Which users are more important ?
    Some employee Email are less critical than other. Provide regular mailbox with less days of deleted item retention and smaller dumpster quota, and provide management with more retention days and dumpster quota. This may save you from using tape to restore from backup.
    You could also set a different SLA (Service Level Agreement) for Email recovery for Management and regular users.
How to remedy a full dumpster ?
Well, I did not get to see the FIFO process for myself, yet. However, if your report state that a mailbox contains 20GB of data and it seems highly illogical or unacceptable in the current storage situation, you can ask the user permission to purge part or all of the Dumpster by using Outlook or Outlook Web App.


In Outlook 2010, go to the Folder ribbon, select Recover Deleted Items, and in the list of items, select a large bunch of Emails and permanently delete them with the X icon.

If the dumpster size is really really bug, you might want to look at the items before deleting them in order to find out if a specific Email caused the dumpster to fill, and what was the cause.

There might be other methods of exporting or deleting items in the recoverable items of a mailbox.. I may look into it in a later date.

Cheers
Liran Zamir

Tuesday, September 17, 2013

Dealing with an urgent mailbox size increase in Exchange 2010 DAG environment


It happens... you set a mailbox limit to an important mailbox.. and than, one day you get a call
"The mailbox is full" !!! We cannot do anything and we are losing business.

Well, the first thing to do is to assign more space to the mailbox.
If the mailbox size limit was set to inherit the Mailbox database limits defaults, you may not want to change the database defaults so not to change the mailbox size limit of all other mailboxes in the database, so go ahead and set the mailbox size limit at the mailbox level, by using the Limits tab on the mailbox properties.
Same thing goes if the limit was already set at the mailbox level - so just set a higher value to the "Prohibit send" and "Prohibit send receive" settings of the mailbox.

Now comes the tricky part...

Setting a new limit will not take effect immediately and might take up to two hours for the Information Store service to check the quota settings again and re-cache and apply the new settings.

This "Time Clock" can be tweaked to refresh more frequently by modifying the Reread Logon Quotas Interval registry key described in the following Microsoft article Mailbox Size Limits Are Not Enforced in a Reasonable Period of Time

However you need a solution and a fast one. So the quick solution will be to restart the Information Store service. However this will take cause all databases to go offline/online on a single server and will cause a fail over on a DAG scenario.

If you are using Exchange in a DAG scenario here is my suggestion:

1. Create a script to move all databases from the server to the DAG replica.
2. Move all active databases using the script to the best target available.
3. Move the database containing the mailbox you want to Super-size BACK to the original DAG member.
4. Restart the information store service on the server that contains the single mounted database.

As a result, only the mailboxes on this specific database will be effected, the restart will also cause the database to fail-over to the replicating server.
As soon as the information store is back online, move the databases back to the original server.
The Information Store is now refreshed, users experienced minimal to non of service outage, and the new size limit is applied.

I would appreciate your comments.
You can prove me wrong any day - but in a friendly manner.

Liran Zamir