Monday, August 3, 2020

Remove that mail from the mail server ASAP !

From time to time something happens in your Exchange environment that require a quick response on your part to remove Emails from user mailboxes.
This can be some sort of phishing Email that slipped in, or even a case where a user or a manager sends something by mistake to a large group or the entire organization with in a careless "Reply to all".

Those cases require you to remove that Email FAST !

The best way I know to respond to those deletion requests is by using Exchange's
Search-Mailbox Powershell cmdlet with a search query that match the item I want to locate and remove.
This command can be run with either the EstimateOnly switch which will generate a items count report of the objects found in a mailbox that match the query, or the DeleteContent switch that will actually delete the item(s). (Other options are also available when using this cmdlet)

This article is intended to assist you in two ways.
  1. Help you organize and test your item-to-delete search query.
  2. Help you locate and delete those mail items FAST in an environment containing multiple Exchange servers holding multiple databases by centrally creating a separate search and delete  Powershell job for every database.
Note!
If the distribution of the mail you want to remove is limited to a group of people you can use the search and remove commands to go over only and specific members of the group with a simple "foreach" on the group's members without searching every mailbox in the Exchange organization.

Permissions, Permissions, Permissions

In order to be able to use the search-mailbox cmdlet your user account will need to assigned the "Mailbox Import Export" role.
For more information about adding roles to role groups, see Add a role to a role group (https://docs.microsoft.com/Exchange/permissions/role-groups#add-a-role-to-a-role-group).

Getting the right command for the task

You will need to gather as much information as possible about the item you want to remove in order to create your search query to find the specific item and not delete anythings else.
Is it a mail item? a meeting? What is the exact subject? does it have a specific body content? what is the from email address? does it have an attachment? what is the attachment name? when was it sent?

You don't actually need all the information, but you need to have enough information to pinpoint the exact items using the search query.
I recommend you also ask for a specific mailbox which has a copy of the item you want to locate and remove so you can do a test run on it.

Here are some examples you can use:

This example will search a specific mailbox for the specific subject, from address and between date range and will provide a result on how many objects were found without deleting the items.

Search-Mailbox <USERNAME> -SearchQuery {Subject:"You Paypal account"},{sent:07/13/2020..07/15/2020},{from:scam@yahoo.com} -EstimateResultOnly

This example will search and delete the items in a specific mailbox which will match the query.
Search-Mailbox <USERNAME> -SearchQuery {subject:"Spam"},{body:"your credit card number"},{sent:07/14/2020..07/14/2020},{hassattachment:true} -Deletecontent -force   

Always try to use the "sent" option to limit the date range of the query it will save run time.

The following article can help you build your search query with more options:
https://www.codetwo.com/admins-blog/search-mailbox-exchange-2013-2016-online-attributes/

After a successful test run you can move on to running the command using your own foreach loop on a limited list of mailboxes or to using the following method to run the command on all mailboxes in all the mailbox databases.

Running the delete command on all mailbox databases

First I suggest to run this from your own admin desktop and not from the Exchange server.
Open regular Poweshell console as admin, replace the server name in the Uri with one of your Exchange server names in order to establish a remote session,
$Session = New-PSSession -ConfigurationName Microsoft.Exchange -ConnectionUri http://ExchangeServerName/PowerShell/
Import-PSSession $Session -DisableNameChecking

Get all mailbox database names and which server holds the copy.
(use a filter to remove databases you don't want to search)

$databases = get-mailboxdatabase | select Name,Server

*** Update the following command with your own SearchQuery

foreach ($d in $databases) {
start-job -Name "$($d.Name)" -ArgumentList ($D.Name),($d.Server) -ScriptBlock {
$Remoteserver = $Args[1]
$curi = "http://$($Remoteserver)/PowerShell/"
$Session = New-PSSession -ConfigurationName Microsoft.Exchange -ConnectionUri $curi
Import-PSSession $Session -DisableNameChecking
$mbx = get-mailbox -Database $Args[0] -ResultSize Unlimited | select samaccountname
                # UPDATE THE NEXT COMMAND WITH YOUR OWN SEARCHQUERY
foreach ($m in $mbx) {
 Search-Mailbox $m.samaccountname -SearchQuery {subject:"Spam"},{sent:07/14/2020..07/14/2020},{from:spammer@yo.com} -Deletecontent -force
}
Remove-PSSession $Session
}
}


The above loop will create a "Job" for each database which will establish a remote session to the mailbox server where the database is located, will enumerate the mailboxes in the database, run the search and delete process on each mailbox and when finished will move the remote session.

On your admin console you can run the following Powershell command to see the remote job status
Get-Job

After a job completes you can see a specific job output with the following command:
Receive-Job <JobName>

After all jobs complete you can remove them with the following command:
Get-Job | Remove-Job

Sunday, April 23, 2017

Import calendar items to user mailboxes while supporting multiple user language folders

Import calendar items to user mailboxes while supporting multiple user language folders (English / Hebrew and others)

It is usual for a company to want to add important events to users calendars such as vacations, holidays etc.
There are a few possible ways to do this. The best option I found is the one that requires the least user intervention which is - not intervention at all.

Basically the method (centered here on Exchange on premise deployment) include the following steps:
  1. Providing HR with mailboxes for prepping the calendars for import. One for each language.
  2. Exporting each mailbox calendar to a PST file.
  3. Clearing permissions from the PST file with MFCMapi tool.
  4. Make sure you got the proper permissions for the task
  5. Scripting the import based on correct mailbox language.

Providing HR with mailboxes for prepping the calendar for import. One for each language
If there are different versions on Office in use withing your company, it is possible that there are different default folder languages (for example Calendar for English "לוח שנה" for Hebrew etc).
Since the import operation will be done from a PST file, the Calendar folder name in the PST file must match the Calendar folder name in the target mailbox.

Create a user and a mailbox for each one of the required languages. 
Logon to each mailbox with Outlook with the proper language in order for the default folders to be created with the appropriate language. (You may also try to logon to the mailbox for the first time with OWA and select the language to be used in order for the default folders to be created with the desired language.

Provide HR with the user accounts and ask HR to fill in the desired calendar items.

Exporting each mailbox calendar to a PST file
After HR are done with adding the required items, log on to each mailbox by creating a unique Outlook profile. This can be much easier if your user account has full mailbox access to all of those mailboxes.

After logging on to each mailbox, go to File menu, Open & Export, Import/Export, Select
Export to a file, select Outlook Data File (.pst).
In the folder tree select the Calendar folder (You may clear the "Include subfolders" if not required.
and provide a name for the new PST file.
Make sure to name the file based on the language of the default folder for that mailbox (ex. English.pst or Hebrew.pst). Click Finish

When the export is done, open the created PST file from within the Outlook profile by using the File menu, Open Outlook Data File (.pst), and selecting the newly created file.
Close the outlook profile


Clearing permissions from the PST file with MFCMapi tool
When exporting a folder to a pst file from Outlook, the PST file contains folder permissions.
Since we will import the PST file to user mailboxes, we would like to prevent removing any existing permissions on the user calendars.

Download a copy of MFCMapi from here

Once downloaded, start the program on the computer where the Outlook profiles are configured.
Click the
Session menu and Click Logon.
Select the Outlook profile for the first PST file to process.
You will see the mailbox and
Outlook Data File. That is the PST file.

Double click the
Outlook Data File.
Expand the
Root Container and Top of Outlook Data file and click Calendar once (based of the language for the specific mailbox profile).
Locate on the list of properties the property named PR_NT_SECURITY_DESCRIPTOR and delete it.
Close all of the application windows and repeat for each Outlook profile language required.

Copy the PST files to a network share to be used later on.

Make sure you got the proper permissions for the task
In the next steps you will need the right to list mailboxes and import PST files into mailboxes using Exchange Management Shell with the command New-MailboxImportRequest
You should check if this cmdlet is available to your account to be used. If it is not you probably require additional permissions. Please see the following Link in order to assign the required permissions:
New-MailboxImportRequest

Scripting the import based on correct mailbox language
Now, we need to identify the user mailboxes to which we would like to import the calendar data and the folder language they are using.
If possible ask HR to provide you with a CSV / Excel file containing the user names. If no such list exists you can use the the following command to generate a list of all mailboxes in the organization

$mailboxes = Get-Mailbox -ResultSize unlimited | select Samaccountname,Enabled,Language

You may use filters in order to remove mailboxes you don't like to include in the list.
You can also export this list to a csv file, edit the list manually, and import it back

Use: $mailboxes | export-csv c:\mailboxes.csv -NoTypeInformation
after editing the list using notepad, import it back using:$mailboxes = import-csv c:\mailboxes.csv


Here are the commands you need to run on the list of mailboxes.
Note that you need to customize it to your environment based on languages and PST file paths

# Import the required Exchange and Active Directory modules
Add-PSSnapIn Microsoft.Exchange.Management.PowerShell.E2010 -ErrorAction Stop
Import-Module activedirectory -ErrorAction Stop

# Check each user on the list for the account status
$mailboxes | foreach { $_.Enabled = (get-aduser -Identity $_.samaccountname).enabled }

# Filter out all the disabled mailbox user accounts
$mailboxes = $mailboxes | where { $_.Enabled -eq $true }

# This will search each mailbox for the calendar type folder and mark the language based on
# the folder actual name. Customize it for your own language needs

Foreach ($m in $mailboxes)  { 
$FolderName = $null
$FolderName = (Get-MailboxFolderStatistics $m.samaccountname | ? {$_.foldertype -eq "Calendar"}).name

if ($FolderName -like "Calendar") { $m.Language = "English" }
if ($FolderName -like "*לוח שנה*") { $m.Language = "Hebrew" }

}

# Imports the proper PST file into the user mailboxes
foreach ($m in $mailboxes) {
if ($m.Language -eq "English") { New-MailboxImportRequest –Mailbox $m.samaccountname –FilePath \\Server\PSTShare\English.pst }
if ($i.language -eq "Hebrew") { New-MailboxImportRequest –Mailbox $m.samaccountname –FilePath \\Server\PSTShare\Hebrew.pst }

}

Additional Notes

Import will fail if a mailbox storage limit has been reached.
You can query the status of the import request using 
Get-MailboxImportRequest and clear the competed ones using 
Get-MailboxImportRequest | where {$_.status -eq "Completed"} | Remove-MailboxImportReuest
Use the same logic to remove failed import requests.

In regards to duplicates, it should not happen by default in case you import the same file twice as the default behavior is "KeepSourceItem". This setting can be modified using the ConflictResolutionOption setting in the New-MailboxImportRequest cmdlet.

I will love to get your feedback

Liran


Tuesday, January 5, 2016

Azure AD Connect does not sync some Active Directory accounts to the cloud


Recently after starting an Exchange Hybrid setup, I've notices that some users were not synced to the cloud, which means licenses cannot be assigned to them as well as cloud mailbox users will not be able to Email to them.

I opened a case with Microsoft, and finally we discovered that all the users in common were flagged as "Linked Mailbox".

Now, a Linked Mailbox are mailboxes that are usually owned by a user account from a different forest (like in a type of deployment where you have a user forest and a resource forest holding the Exchange mailboxes).

This however was not the case.

The status of a Linked mailbox is determined by the user attribute msExchRecipientTypeDetails.
A Linked mailbox will have have a value of 2 while a regular user mailbox (on premise) will have the value of 1.

You can reference the values in the following link:

O365: Exchange and AD - How msExchRecipientDisplayType and msExchangeRecipientTypeDetails Relate to Your On-Premises

Since must of my users are still on premise, I wanted to investigate how many of them had this value so using my favorite Quest Active Roles add-on and run:

$linkedMailboxes = Get-QADUser -SizeLimit 0 -IncludedProperties msExchRecipientTypeDetails | where {$_.msExchRecipientTypeDetails -eq 2} | select name,samaccountname

It is also possible to get the list by using the Active directory Powershell module:

$linkedMailboxes = Get-ADUser -Filter 'msExchRecipientTypeDetails -like "2"' -ResultSetSize $null  | select name,samaccountname

After I reviewed the results of $linkedMailboxes the next step was to modify the value from 2 to 1.

$linkedMailboxes | foreach { set-QADUser $_.samaccountname -objectAttributes @{msExchRecipientTypeDetails=@(1)} }

This can also be done using Active Directory Powershell module with the command:

$linkedMailboxes | foreach { Set-aduser $_.samaccountname -replace @{msExchRecipientTypeDetails=1} }


After performing the change run your AD connect synchronization and verify that the users from the query now appear in the cloud.
If they are not there yet, it is possible that there are additional attributes that can cause the object to fail synchronization.

Hope you will find this Helpful


Monday, May 18, 2015

Be alerted of upcoming full executive mailboxes


It is a good idea to keep mailbox size limits on your on-premises Exchange Servers for a few reasons:

- Preventing "mail storms" from running your databases storage out of disk space.
- Being able to control the maximum desired size of the mailbox databases.
- No mailbox limit means that nothing is get deleted and the Exchange becomes a document storage.

However, there are always those important management users that you don't want to allow them to run out of mailbox space.
A full mailbox in those cases may mean that a very important Email will not be received and your job will be on the line (and no one will care that the executive assistant disregarded all of those mailbox storage space warning messages even weeks before the mailbox clogged up).

So what can be done ?
Create a script to notify you of those mailboxes that are about to run out of space !The script that can be run daily will give you the option to either enlarge the mailbox or notify the user to archive or delete unneeded Emails.
Do not wait for the last moment as changing a mailbox size can take up to 2 hours go into effect:
Mailbox Size Limits Are Not Enforced in a Reasonable Period of Time


Here are the steps to make your notification script:

1. Set specific per-mailbox quota for executive mailboxes.
First, set up a mailbox quota for each user, letting go of the default database quota settings.
Keep those setting alive... but configure specific mailbox limit for each one of those mailboxes because you know that when the time comes you will need to change it anyway.

2. Set a way to distinguish between executive and none executive user mailboxes.
In order for the script to notify you about executive users only, you should set up a way to distinguish between executive and non-executive mailboxes.
One way (that I use in the script) is to gather all executive mailboxes into specific database / databases.
Another way is to assign a specific value in AD for executive users which you could query to gather all the executive mailboxes from all the Exchange databases.

for example:
$VIPList = get-mailboxdatabase *vip* | get-mailbox -ResultSize unlimited
Gets all mailboxes located on databases who's name contains the word VIP
Note ! My script uses this method so make sure to modify the script if needed !!! 

$VIPList = get-mailbox -ResultSize unlimited | where {$_.CustomAttribute10 -like "Executive"}
Gets all mailboxes with the value "Executive" in CustomAttribute10.

Of course you can use any desired attribute and any desired value to distinguish the executive mailboxes.

3. Select who will be notified
You may be the one who makes the decisions what actions to take when the reports arrive, or you may want your Help Desk to handle this task, so you need to decide who's Email the script will use (you can always assign multiple Email addresses).

4. Which SMTP server to use in order to route the mail
Nothing special here. You need an SMTP server (hub transport or other) to sent the notification Email.

Download the script here

The script assumes the executive databases are named with VIP in the database name.
You MUST change to your own search convention as stated above.
Also change the following parameters:

$SMTPServer = "192.168.1.2"
$ReportExceedingPrecentage = "94"
$ReportSender = "ExchangeServer@Mydomain.com"
$ReportRecipients = "HelpDesk@Mydomain.com","Me@Mydomain.com"

$SavedReportFilePath = "C:\LargeVIPMailboxes-$date.html"

Keep the $date.html at the end so the file will be saved with the date of creation.

This is how the report should look.
Just make sure to schedule the script for a daily run.
For assistance with creating a batch file for scheduling see my article


Thursday, May 7, 2015

Using the Exchange 2010 Anti-Spam feature to block specific IP addresses

The Exchange anti-spam features allow for a verity of options for protecting the Exchange environment.
Those features can be implemented for the Edge transport server or even on the Hub transport servers.

My article will focus on installing the Anti-Spam features on the Hub transport servers and on a script I wrote to automate adding / removing / viewing the IP addresses that are configured to be blocked by the IP Block List.

The reason I found for this is that in a large environment you may find that many servers are configured to be allowed connection and even relay using the Exchange Hub Transport SMTP service.
At times you may find that one of those servers go bad and starts sending a lot of Emails and even flood your Exchange server due to a software bug, or even if you would like to block a connection coming from the Internet (in case your Exchange server is getting its Emails directly).

If you got a single Hub Transport server you could easily do this configuration manually, however if you are using multiple hub transport servers and would like to configure the block list using a single commend the script may be helpful.

Lets begin...

Installing the Anti-Spam functionality
To start using those options you need to install them on the Transport/Edge Exchange server.
The installation is done using the built in .\install-AntispamAgents.ps1 script located on every Exchange server at  %system drive%/Program Files\Microsoft\Exchange Server\V14\Scripts folder

After installation the transport service needs to be restarted with the command
Restart-Service MSExchangeTransport or by using the services console.

For more information on installing this component see
Enable Anti-Spam Functionality on a Hub Transport Server


By default all of the Anti-Spam features are enabled at the Organization level in the management console, however they are not configured.


I chose to disable the features I did not want to run.

The Next step will be to install the Anti-Spam feature on every Hub Transport server you want.

It should be noted that every Hub Transport server can be configured differently altogether so you should decide if to install the feature and where.

The provided script makes an assumption that all Hub Transport servers in the organization will use the same IP blocking settings, so you may need to modify the script for your own environment.

Next we will take a look at how to configure the feature manually using the management console.
Navigate to the Server Configuration section, select a Hub Transport server where you installed the features and you will see the Anti-Spam tab.


When we select Properties we are able to add or remove a specific IP address, Subnet or range of IP addresses.


You can also see that it is possible to define if the blocking will never expire or set this blocking to expire at a specific date and time.

I would not recommend using complete network subnets or IP address ranges unless you are sure that there is no scenario there there will need to unblock a specific address from the range or subnet.

You can add an IP address manually to check how this feature work, for example by adding your workstation IP address and then using Telnet command to perform an SMTP Email transaction with the server.


The result above will be seen by the sending party.
In case this is a real mail server with mailboxes, the sender will get this message as an NDR.

However since the SMTP session will be disconnected right after the "Mail From" section, this messaging transaction will not be logged or found in the Exchange tracking logs. The server owner should be informed that you configured the IP to be blocked since if the server is using an application to send Emails and those will fail to be routed the only way to discover why will be by using Telnet from the sending server to the HT server and seeing this error message.

Now that we know what is expected to happen lets continue to the automation section.
Copy the following script into a new text file using notepad and save as IPBlockListScript.ps1

#####
Add-PSSnapin microsoft.exchange.management.powershell.e2010 -ErrorAction silentlycontinue

$selection = $null
Do
{
cls
write-host Exchange 2010 Transport IP Blocker Manager script be Liran Zamir -ForegroundColor yellow
write-host " "
write-host "Please Select action:"
write-host ""
write-host "1. Add IP to be blocked on the Exchange transport servers"
write-host "2. Remote IP from the Exchange transport servers block list"
write-host "3. Display blocklist from a random transport server"
write-host "X. To quit"
write-host ""
$selection = read-host "Type selection"

if ($selection -eq 1) {
cls
$AddIPblock = Read-Host “Type and IP address to block SMTP connections to Exchange servers”
[ref]$a = $null
if (![system.net.IPAddress]::tryparse($AddIPblock,$a)) { write-host "" ; write-host " !!! The IP address is invalid. !!!" -ForegroundColor white -BackgroundColor red ; read-host " "}
else {

$servers = Get-TransportServer | select name
foreach ($x in $servers) { Add-IPBlockListEntry -IPRange $AddIPblock -server $x.name -ExpirationTime '12/31/9999 11:59:59 PM' }
write-host ""
read-host "IP address was added to the block list"
}
}

if ($selection -eq 2) {
cls
$RemoveIP  = read-host “Type the IP address to remove from the block list”
if (![system.net.IPAddress]::tryparse($RemoveIP,$a)) { write-host "" ; write-host " !!! The IP address is invalid. !!!" -ForegroundColor white -BackgroundColor red ; read-host " "}
else {
$removefromservers = Get-TransportServer | select name,IPIdentity
$r = Get-IPBlockListEntry -server (Get-TransportServer)[0].name | select IPrange
$found = $null
0..($r.count-1) | foreach { $r[$_].iprange ; if ($r[$_].iprange -like $RemoveIP) { $found = "Yes"  } }
if ($found -eq $null) { write-host "" ; write-host " !!! The IP address you typed was not found !!! " -ForegroundColor white -BackgroundColor red ; read-host " " } 
else {
foreach ($s in $removefromservers ) { remove-IPBlockListEntry -identity ((Get-IPBlockListEntry -Server $s.name | where {$_.iprange -eq $RemoveIP  }).identity) -server $s.name -confirm:$false }
write-host ""
read-host "IP address was removed to the block list"
}
}
}

if ($selection -eq 3) {
cls
write-host " "
write-host "List of blocked IP addresses on the transport server "
write-host " "
Get-IPBlockListEntry -server (Get-TransportServer)[0].name | select IPrange
write-host " "
read-host "click Enter to return to menu"
}

} While ( $selection -ne "x")

write-host " "
#####


You will be able to run this script on the Exchange server or on your own workstation as long as you have the Exchange 2010 Powershell management installed.
When you run the script you will be presented with a simple menu

The first option will allow you to specify an IP address (only, no ranges or subnets) to be blocked.
The script then will verify that the IP address type is in a proper IP address format, and then enumerate the hub transport servers and add the IP address to each of those servers with an open-ended expiration date.

The second option will allow you to remove an IP address from the list of blocked addresses.
Here again the IP address you typed will be validated also for correct IP address syntax as well as verify of the first first enumerated Hub Transport server that the typed IP address is indeed set to be blocked.
If all goes well, the IP address will be removed from the blocked IP list on all the HT servers.

The third option allows you to view the list of blocked IP addresses from the first enumerated Hub Transport server.

Please note the script will not work well for removing the last blocked IP address (so you may choose to first add a false IP such as 1.1.1.1 to the list - this will also allow you to verify the Add IP functionality).

The script also does not handle IP subnets or ranges.

Another important note; If you configured a receive connector to specifically allow relay for the IP address or range of IP addresses that includes the IP address you want to block, the block feature will not work until you remove the IP address / subnet / range from the allowed to relay list on the receive connector.

Hope you enjoyed this post... you are welcome to let me know.


Wednesday, February 18, 2015


Auditing mailbox actions for security and accountability

I was facing with a challenge. A company VIP with a few secretaries, and a few mobile devices was facing a serious issue. Calendar items were changing by themselves. Updates were sent to attendees but something changed the meeting date / time on the owner mailbox.
I was asked to find out what is the root cause.

In order to do that, there are two tools:

  1. The Microsoft Exchange Troubleshooting Assistant (Extra.exe) which will allow you to gather the information, but you will have to open a case with MS in order to get the results.
    The process requires to start the tool on the mailbox server of the effected user and target the user mailbox to perform a trace up until the issue occurs
    .
  2. Enable Mailbox Audit on the Exchange Server (2010)

    This will be the path we will investigate


    Enabling mailbox auditing is something that you can do by yourself. The audit can be used for security reasons (see who is abusing his/her assigned permissions to do something that they are not supposed to do), this includes Admins as well as Delegates, but also you can configure to audit the mailbox owner actions which can help with troubleshooting.

    The Audit is enabled per user mailbox and is saved as a part of the mailbox.
    The audit log needs to be enabled, the amount of days to save the audit can be specified (90 days by default), and most importantly, you must configure what to audit.

    In my case, the default owner audit setting did not include all types of operations so it was difficult at first to track the problem. (which was discovered by the trace due to the lack of information). However, after enabling additional audit items on the mailbox owner, it enabled tracking all actions and associating specific calendar actions with a specific ActiveSync mobile device.
    This eventually was found to be the cause of the above problem.

    So... Lets start this thing:

    First, log on with a user with administrative rights to the Exchange server to enable auditing for the user mailbox you would like to investigate.

    Now, Enable auditing on the mailbox with the command:

    Set-Mailbox UserName -AuditEnabled $true

    This command will enable auditing for Admin actions as will as Delegate actions, but not for mailbox owner actions.

    If you run the command Get-Mailbox UserName | select *audit*
    you will see exactly what is audited and what is not:

    AuditEnabled     : True
    AuditLogAgeLimit : 90.00:00:00
    AuditAdmin       : {Update, Move, MoveToDeletedItems, SoftDelete, HardDelete, FolderBind, SendAs, SendOnBehalf, Create}
    AuditDelegate    : {Update, SoftDelete, HardDelete, FolderBind, SendAs, Create}
    AuditOwner       : {}

    You may notice that by default the mailbox owner is not edited.

    If you will run the command: Set-Mailbox Username -auditowner $true
    you will see that the AuditOwner setting changes to:

    AuditOwner       : {Update}

    This is nice, but may not be enough to get all the information you want.

    Lets enable auditing for all options for both Admin, Delegate and owner:

    Set-Mailbox UserName -AuditEnabled $true -AuditAdmin Update,Move,MoveToDeletedItems,SoftDelete,HardDelete,FolderBind,SendAs,SendOnBehalf,Create -AuditDelegate Update,SoftDelete,HardDelete,FolderBind,SendAs,Create
    -AuditOwner Update,Move,MoveToDeletedItems,SoftDelete,HardDelete,Create

    Of course this will consume more space, however you only need to enable this when you need to investigate an issue or on a regular basis for specific users.

    Now, allow some time for the information to be collected.

    When you want to investigate, you will need to view or export the information in order to filter them more easily.

    The command that is used to retrieve the data is:
    Search-MailboxAuditLog UserName -ShowDetails

    This will give you tons of lines if information on every every action performed on every item.
    You can either use powershell to filter the output sent to the screen, or you can more easily send everything (filter or unfiltered) to a CSV file later to be opened in Excel or your favorite spreadsheet.

    Search-MailboxAuditLog UserName -LogonTypes Admin,Delegate,Owner -ShowDetails | export-csv c:\UserName.csv -Encoding utf8

    Please note that you can specify all type of logon types (as shown in the command above) or just specific logon type such as Delegate if you only want to get data about actions performed by the delegates.
    The command -Encoding utf8 will allow exporting of characters that can be identified for non-English (in my case Hebrew) in the item subject.

    You can additionally filter based of available properties, for example, add the following pipe between the Search section and the Export section in order to filter audit items in the calendar folder only | where {$_.FolderPathName -like "\calendar"} | 
    If English is NOT your default folder language you will need to modify the folder name based on your folder language.

    In the CSV file you will get all the detailed information on the actions performed.
    The information also include the client type, such as Outlook and even ActiveSync.
    The ClientInfoString provides the full Device information so you will be able to tell which device performed the action (this is very helpful in case that a few devices are user to sync with the same mailbox).

    Another option to view and filter audit logs for a specific mailbox is using the Exchange Control Panel (ECP) on your exchange server. For example user https://yourserver/ecp


    However, based on available options, it doesn't seem you can view owner actions using this interface.

    I hope this article will provide you with valuable information for troubleshooting.
    If you like this article you are welcome to drop me a line at: liranzamir@gmail.com


Monday, September 30, 2013

Testing your Exchange Server ActiveSync


Back in the old days, it was possible to download a kind of virtual Windows Mobile device which you could use to test your Exchange ActiveSync. Today you got more options.

Microsoft Remote Connectivity Analyzer
First, everybody must get to know Microsoft's Remote Connectivity Analyzer found here .


Microsoft did a great job with this tool which continues to evolve over time, providing more and more testing tools, from ActiveSync, to Autodiscover, Web services, Outlook Anywhere, POP/SMTP, Lync and OCS and even the Microsoft  cloud (Office 365).

This online tool often provides detailed information regarding the steps taken and what went wrong.


MobilityDojo.net - EAS - MD Tool
One of my favorite ActiveSync testing tools for some time is MobilityDojo.net 's EAS-MD tool. Click here
The tool, which is also updated by it's creators, supports Exchange 2007/2010/2013.
Unlike Microsoft's Remote Connectivity Analyzer, EAS-MD puts it's focus on ActiveSync and Autodiscover (partially since it still will not analyze Service Connection Point (SCP) data from Active Directory).

However, the thing I like most about this tool, is that it is simple to user, and you can use it anywhere on your network or the Internet.

before we go into a few screenshots, let me give you examples regarding how I put this tool to use:

  • Testing "Before" or "After" your proxy/router  When your infrastructure includes a reverse proxy / TMG server / firewall / router, and you want to troubleshoot ActiveSync connectivity "before" the device or server (on your LAN), or "after" the proxy (in your DMZ or Internet).

    Running synchronization tests with the tool in both locations (something you will usually not be able to do with a real device because of DNS name resolution and networking restrictions) will help you find out if the problem is with the Exchange server, proxy server or even with your ISP.

  • Testing specific CAS servers in a CAS Array 
    Without a direct testing tool, checking each CAS (Client Access Server) in a CAS Array for ActiveSync problems (independent of Exchange's own built in tests and logs), can be very challenging. Using the tool you can simply configure the individual CAS server you want to test.

  • Testing specific user connectivity issues
    If you administer Exchange servers, you probably know the case... A user cannot sync a device, and you have to help him as well as provide proof that your precious Exchange server is not refusing service to the user. All you need to do is have the user enter his credentials into the tool and basic ActiveSync connectivity tests will be performed with his / her mailbox.

  • Creating Fake devices
    Strange... but in an upcoming post I will show you that having too many ActiveSync devices partnered to a specific mailbox can cause you a and your users a lot of headache.
    Before removing real device partnerships (using the upcoming article), you can use the EAS-MD tool to create "Fake" devices with your test mailboxes so you can test the procedures of deleting device partnerships without really using multiple phones or tablets.

  • Checking your SSL Certificates
    The tool can also query and provide information regarding your SSL certificates. The information can also be copied as text for later troubleshooting.

I'm sure that other reasons can be found to use this tool, so lets have a look.

First download the small ZIP file containing the tool from here
The web site states the version as 1.6, but it is actually 1.7. The site also states that Windows 7/2008 are required, but I had no problem running in on Windows XP SP3.

Testing connectivity and Synchronization


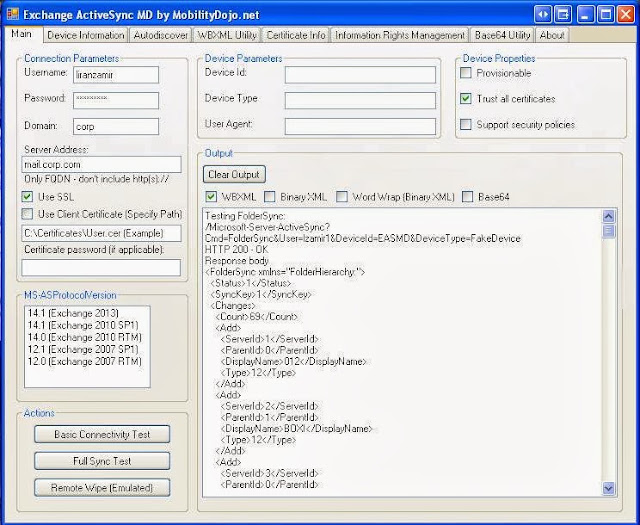
The fist screen of the application is usually the one you need for ActiveSync testing.
In the connection parameters enter your (mailbox to be tested) domain credentials, the CAS server name
(This can be from the Internet or from inside your LAN), select to use SSL (who doesn't), and version of Exchange server.

On the upper right, select Trust all certificates. This will have you bypass sync issues that will likely happen when you are testing on your LAN (such as using self signed certificate which you did not bother to install the CA certificate to your test computer, testing a specific CAS server internal FQDN which is not a part of the certificate's Subject Alternate Name, and so on).

Now click Basic Connectivity Test to perform... basic test :-) this test will show you that you are able to talk to the CAS server over ActiveSync and authenticate.

Now you can click Clear Output to clean the screen.

Click Full Sync Test to re-authenticate and actually see a synchronization of the mailbox folders.


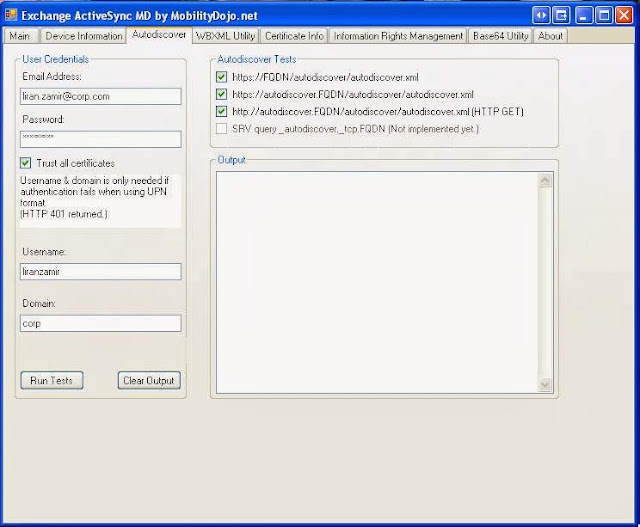
Testing AutoDiscover


This test is somewhat disappointing as it still cannot query Active Directory for SCP (Service Connectio Point) which is the source of AutoDiscover information for domain joined workstations.
However, if you rely on DNS records (internal or externally to your network), the tool will query them and show you if it was successful or not and what it found. Use the information for troubleshooting incorrect settings.

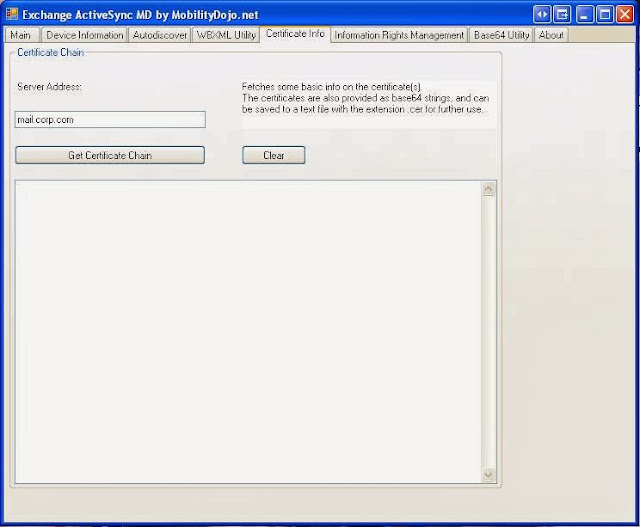
Testing the certificate chain


Unless you are using a self signed certificate, the SSL certificate on your Exchange server or proxy server came from a Certificate Authority (CA).
Certificate Authorities are servers which issue digital certificates to other CAs and/or the final SSL certificates (this is a very loose explanation). In order for a certificate to be trusted or "believable" by devices such as ActiveSync devices, web browsers and mail clients, the entire "Certificate chain" must be known and trusted.
Use this tool to query the certificate chain of your Exchange / TMG SSL certificate when the certificate may be the root of the connectivity issues.

Hope this makes sense...

Post your feedback. Please !